
Pink Drip Cake
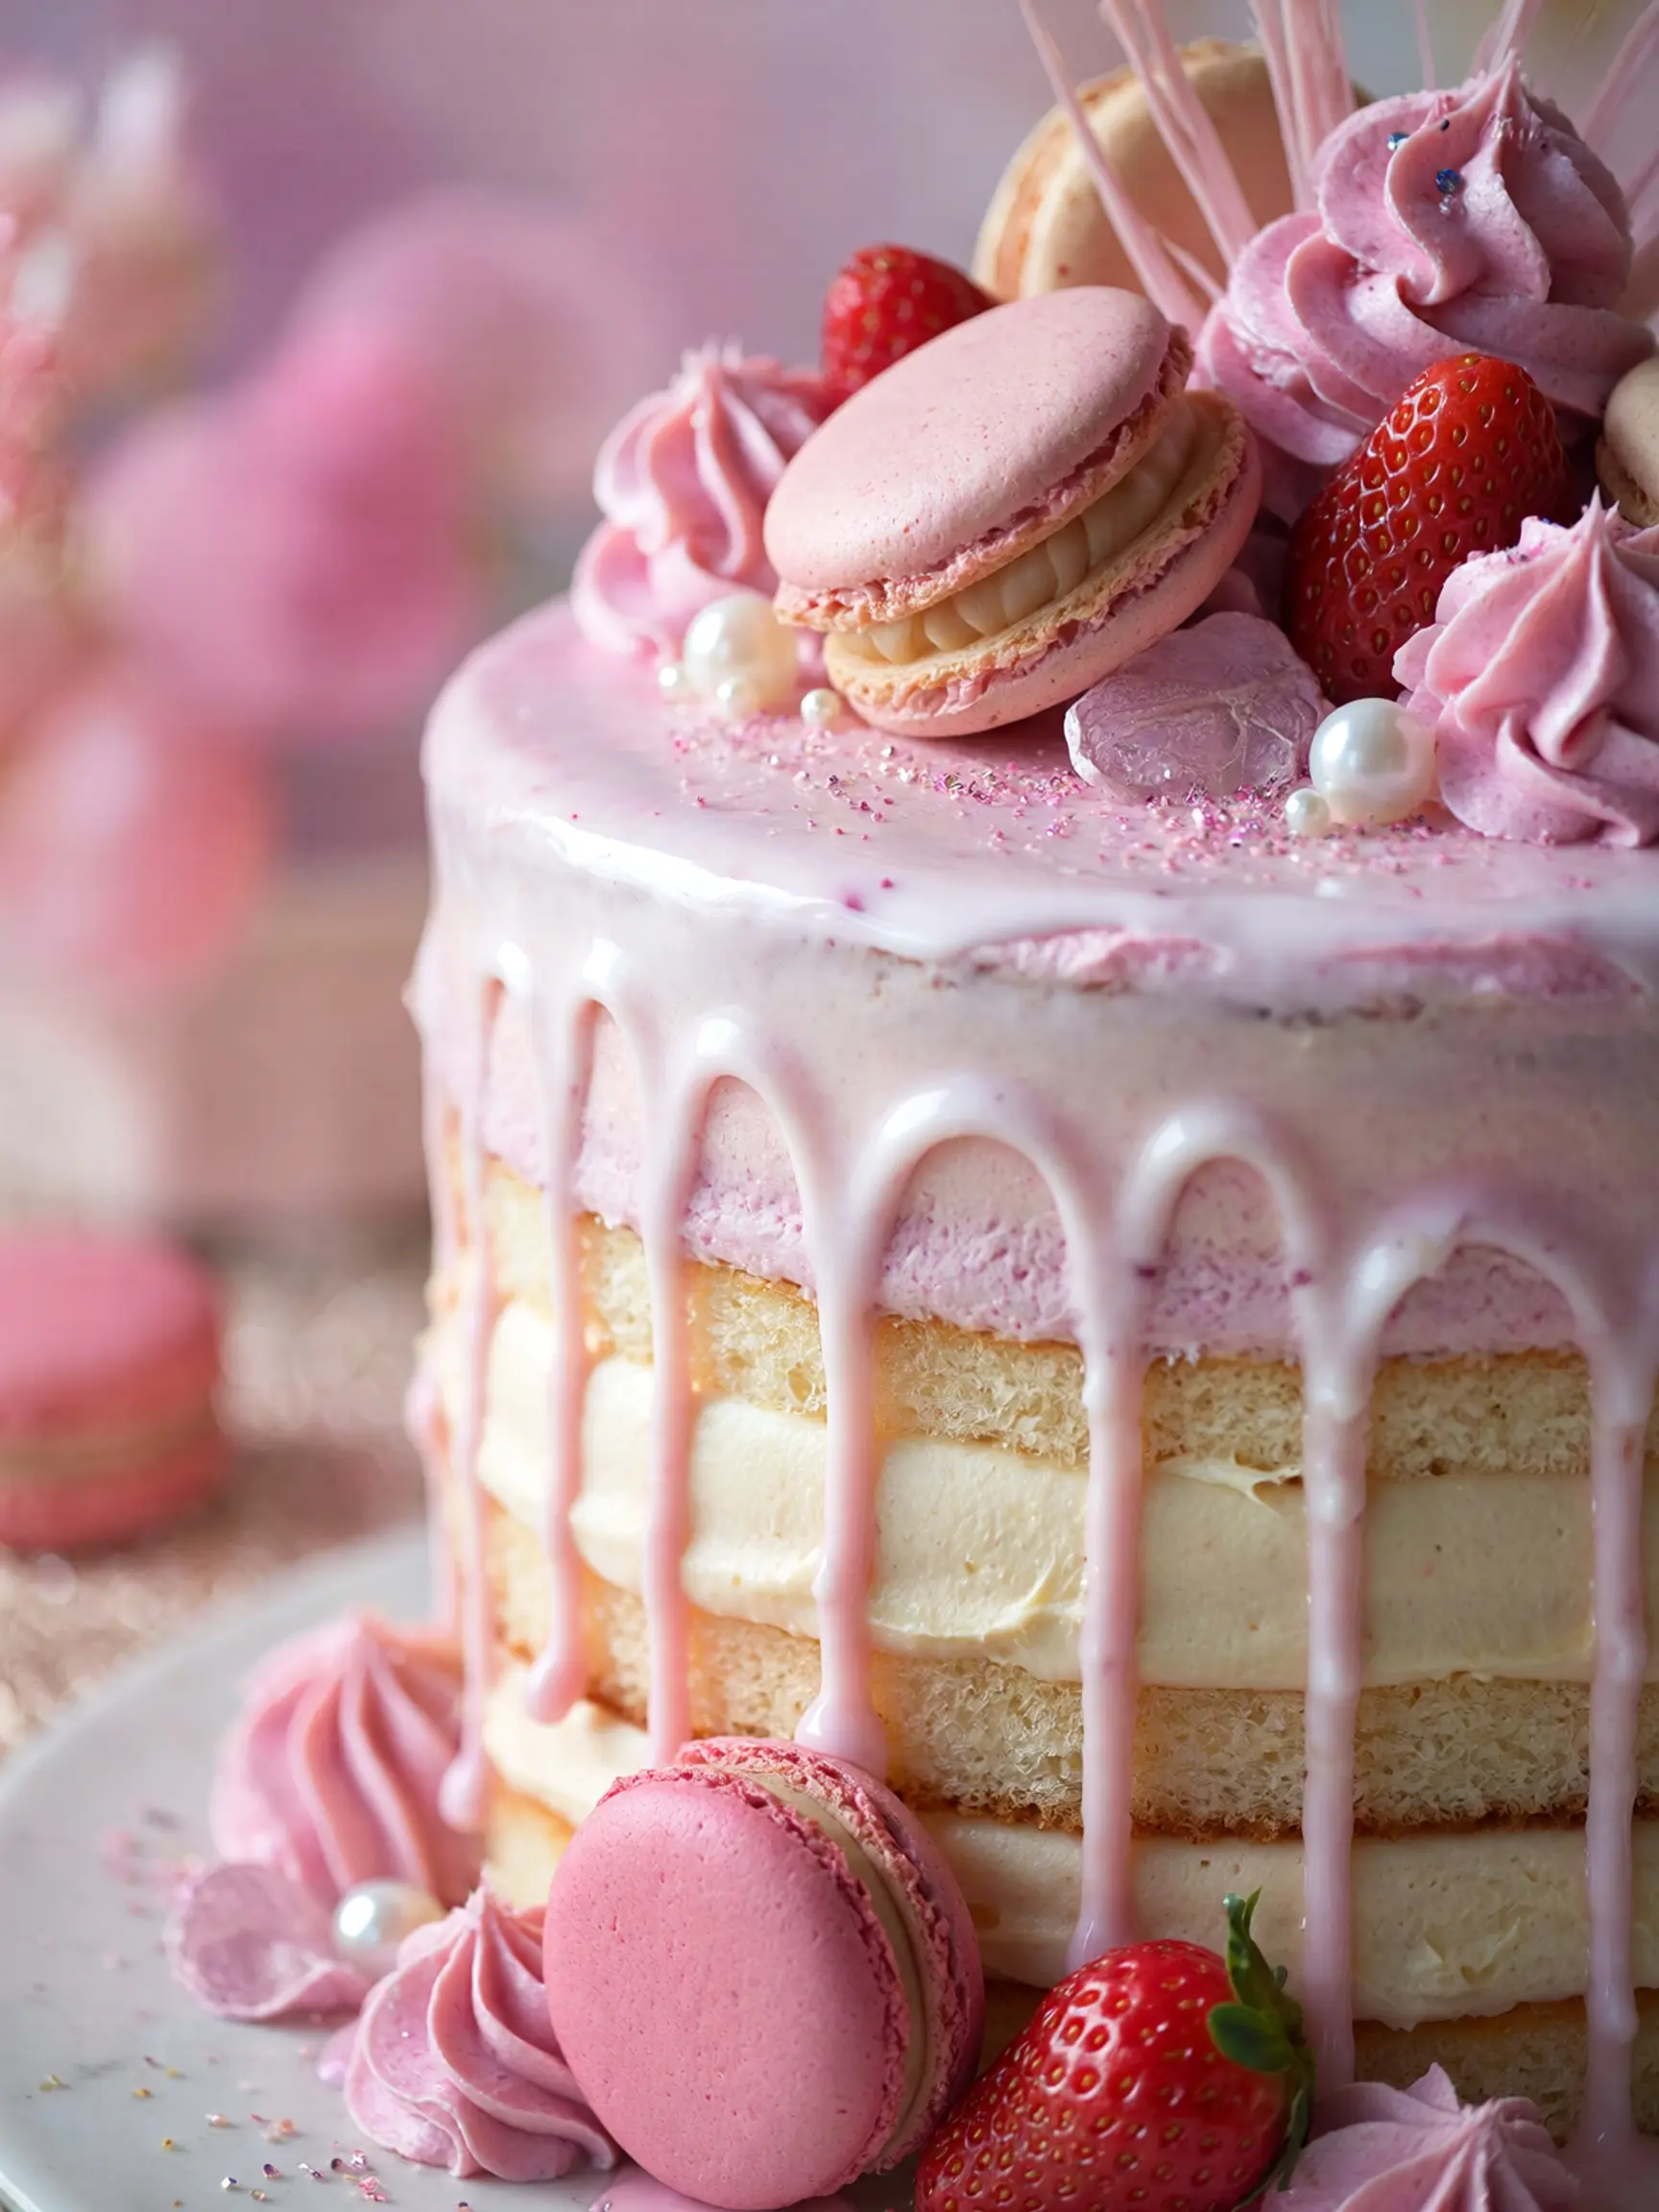
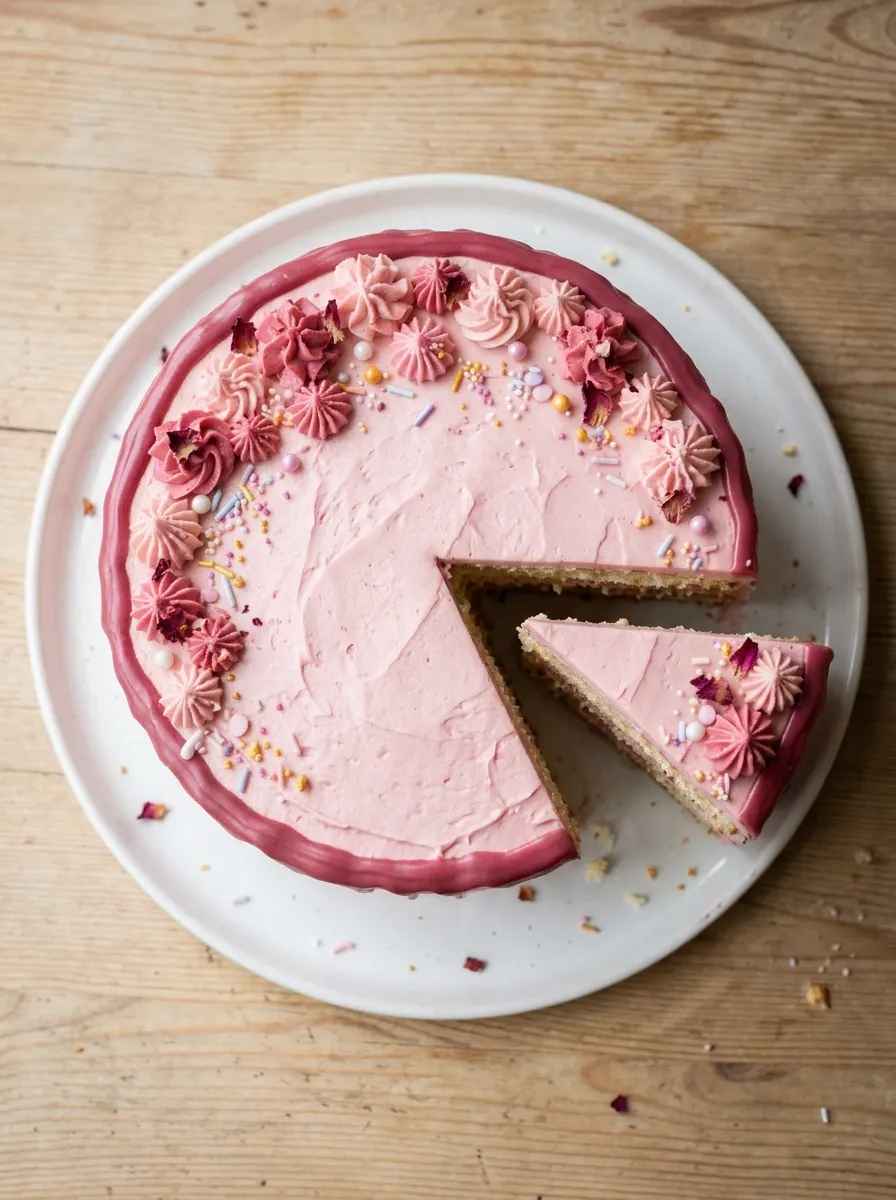
This Pink Drip Cake is a beautiful showstopping dessert featuring soft, tender cake layers, creamy frosting, and a glossy pink drip that makes every slice feel celebration-worthy. Its elegant color and playful design make it perfect for birthdays, baby showers, bridal celebrations, afternoon parties, and other special occasions.
What makes this Pink Drip Cake so appealing is that it looks impressive without requiring professional decorating skills. Smooth layers of frosting provide the perfect canvas for the colorful drip, while sprinkles, fresh berries, candy, or delicate decorations can be added to create a style that matches your celebration.
Whether you are making a cake for a special event or simply want an eye-catching homemade dessert, this Pink Drip Cake is sure to become the centerpiece of the dessert table. Serve each slice chilled or at room temperature and enjoy the combination of tender cake, creamy frosting, and sweet pink drip.
Table of Contents
Ingredients
This recipe builds a four-layer 8-inch pink vanilla cake with vanilla Swiss meringue buttercream and a white chocolate pink ganache drip. Each component is detailed separately for clarity and ease of execution.
For the Vanilla Cake Layers (makes four 8-inch layers):
- 3 cups (360g) all-purpose flour, spooned and leveled
- 1 tablespoon baking powder
- ½ teaspoon baking soda
- 1 teaspoon fine sea salt
- 1 cup (225g) unsalted butter, at room temperature
- 2 cups (400g) granulated sugar
- 4 large eggs plus 2 egg yolks, at room temperature
- 1 tablespoon pure vanilla extract
- 1 teaspoon clear vanilla extract (for a pure white crumb — optional but recommended)
- 1½ cups (360ml) whole buttermilk, at room temperature
- 2–3 drops pink gel food coloring (optional — for a blush-pink cake interior)
For the Swiss Meringue Buttercream:
- 6 large egg whites
- 1¾ cups (350g) granulated sugar
- 2¼ cups (510g) unsalted butter, cut into tablespoon-sized pieces, at room temperature
- 2 teaspoons pure vanilla extract
- ¼ teaspoon fine sea salt
- Pink gel food coloring (start with 2 drops and build — gel coloring is far more concentrated and vibrant than liquid)
For the Pink White Chocolate Ganache Drip:
- 200g (7 oz) good-quality white chocolate, finely chopped (bars, not chips — chips contain stabilizers that prevent smooth melting)
- ½ cup (120ml) heavy cream
- Pink oil-based food coloring or pink candy melts coloring (water-based food coloring will seize white chocolate — always use oil-based for chocolate)
- 1 teaspoon light corn syrup (adds gloss and fluidity to the ganache — optional but highly recommended)
For Decoration:
- Fresh or freeze-dried strawberries
- Pink and white macarons (store-bought is perfectly acceptable)
- Edible gold leaf or gold luster dust
- Fresh roses or food-safe flowers
- Pink sprinkles or sugar pearls
- White chocolate shards dusted with edible pink luster dust
Smart Substitutions: No buttermilk? Make your own by adding 1.5 tablespoons of white vinegar or lemon juice to 1.5 cups of whole milk, stirring, and letting it sit for 5 minutes. Prefer cream cheese frosting over Swiss meringue buttercream? Use 2 blocks of full-fat cream cheese, 1 cup of softened butter, 5 cups of powdered sugar, and 1 teaspoon of vanilla — it pipes beautifully and pairs wonderfully with the vanilla cake. Allergic to white chocolate? Use a ruby chocolate ganache instead — it has a natural pink-red hue that requires no coloring and a slightly fruity flavor that is extraordinary.
Timing
A four-layer drip cake requires planning and patience. This is not a 45-minute weeknight project — it is a celebration bake that rewards preparation and care. Here is the full timeline:
- Day One — Bake the Cake Layers: 30 minutes prep + 28–30 minutes baking per batch = approximately 2 hours total including cooling
- Day One — Make the Buttercream: 30 minutes
- Day One — Crumb Coat and Chill: 20 minutes + 30 minutes refrigeration
- Day Two — Final Frost and Chill: 30 minutes + 1 hour refrigeration
- Day Two — Make Ganache and Apply Drips: 20 minutes
- Day Two — Decorate: 20–30 minutes
- Total Active Time: Approximately 3 hours 30 minutes across two days
- Servings: 16–20 slices
- Difficulty Level: Intermediate
Pro Timing Tip: Baking the cake layers one to two days in advance and wrapping them tightly in plastic wrap is one of the most impactful things you can do for this cake. Freshly baked cake layers are too fragile and moist to frost cleanly. Rested, chilled layers are firmer, easier to level, and far less likely to crumble during assembly. Many professional bakers freeze their layers overnight — frozen layers are the easiest to work with of all.
Step 1: Bake the Vanilla Cake Layers
Preheat the oven to 350°F (175°C). Grease four 8-inch round cake pans, line the bottoms with parchment paper circles, and grease the parchment. In a medium bowl, whisk together the flour, baking powder, baking soda, and salt. Set aside.
In the bowl of a stand mixer fitted with the paddle attachment, beat the room-temperature butter and sugar on medium-high speed for a full 4–5 minutes until the mixture is pale, significantly increased in volume, and genuinely fluffy. Do not rush this step — proper creaming incorporates air into the fat and sugar matrix that is responsible for the cake’s tender, light crumb. Add the eggs and egg yolks one at a time, beating for 30 seconds after each addition. Add both vanilla extracts and mix to combine. Add the pink gel food coloring if using a tinted interior, starting with 2 drops and adjusting.
Add the flour mixture in three additions, alternating with the buttermilk in two additions, beginning and ending with the flour. Mix on low speed until just combined after each addition — overmixing develops gluten and produces a tough, dense cake rather than the tender crumb you are aiming for. Divide the batter evenly among the four prepared pans (a kitchen scale makes this precise — approximately 420g per pan). Bake for 28–30 minutes until a toothpick inserted in the center comes out clean or with just a few moist crumbs. Cool in the pans for 15 minutes, then turn out onto wire racks to cool completely.
Step 2: Make the Swiss Meringue Buttercream
Swiss meringue buttercream is the professional baker’s frosting of choice for drip cakes because it is silky, stable, not overly sweet, and creates the perfectly smooth canvas that drip ganache requires. In a heatproof bowl set over a pot of simmering water (the bottom of the bowl should not touch the water), combine the egg whites and granulated sugar. Whisk constantly while heating until the sugar is completely dissolved and the mixture reaches 160°F (71°C) on an instant-read thermometer — this pasteurizes the egg whites, making them safe to consume.
Transfer immediately to the bowl of a stand mixer fitted with the whisk attachment. Beat on medium-high speed for 10–12 minutes until the meringue is bright white, completely cool to the touch, and holds stiff, glossy peaks. This cooling stage is critical — adding butter to a warm meringue will melt it and produce a soupy mess. Once fully cool, switch to the paddle attachment and add the room-temperature butter one tablespoon at a time, beating well after each addition.
The mixture may look curdled or soupy at some point during this process — do not panic. Keep beating. It will come together into a silky, smooth buttercream within a few minutes. Add the vanilla extract, salt, and pink gel food coloring a drop at a time, beating after each drop until you reach your desired shade of pink. Beat on medium speed for 2 more minutes to eliminate any air bubbles.
Step 3: Level, Fill, and Crumb Coat
Using a long serrated knife or a cake leveler tool, level the top of each cake layer so all four are completely flat and even. Place a small dab of buttercream on your cake board or serving plate and press the first cake layer onto it — the buttercream acts as an adhesive that keeps the cake from sliding during frosting.
Spread approximately ¾ cup of buttercream evenly over the first layer, then place the second layer on top and repeat. Continue with all four layers, pressing each one gently to ensure good contact. Apply a thin layer of buttercream all over the outside of the cake — this is the crumb coat, designed to trap any loose crumbs so they don’t appear in the final frosting layer. Smooth roughly with an offset spatula, cover loosely, and refrigerate for a minimum of 30 minutes until the crumb coat is completely firm to the touch.
Step 4: Apply the Final Frosting
Remove the chilled cake from the refrigerator. Apply a generous layer of pink Swiss meringue buttercream to the top and sides of the cake using an offset spatula. For the smooth, professional finish that makes drip cakes look so polished, hold a bench scraper vertically against the side of the cake and rotate the cake turntable slowly while keeping the scraper steady — the scraper removes excess buttercream and leaves a perfectly smooth surface in one fluid motion.
For a perfectly sharp top edge, scrape the sides until smooth, then use the offset spatula to pull any buttercream that extends above the top edge inward toward the center of the cake in short, even strokes. Refrigerate the fully frosted cake for a minimum of 1 hour until the buttercream is completely firm and cold to the touch. This chilled, firm surface is the foundation that makes perfect drips possible — ganache applied to a soft or warm buttercream surface will not set into defined drips.
Step 5: Make the Pink White Chocolate Ganache
Place the finely chopped white chocolate in a heatproof bowl. Heat the heavy cream in a small saucepan over medium heat until it just begins to simmer — small bubbles forming around the edges of the pan. Do not let it boil. Pour the hot cream over the white chocolate and let it sit undisturbed for 2 minutes to allow the heat to melt the chocolate. Stir gently from the center outward in slow, deliberate circles until the ganache is completely smooth and glossy.
Add the corn syrup if using and stir to incorporate. Add the pink oil-based food coloring a drop at a time, stirring after each addition, until you reach your desired shade of pink. Let the ganache cool at room temperature, stirring every 5 minutes, until it reaches 90–95°F (32–35°C) on an instant-read thermometer. This is the critical temperature window for perfect drips — warm enough to flow smoothly but cool enough to set before reaching the bottom of the cake. Test on the side of a cold glass or jar before applying to the cake — the drip should flow slowly and stop on its own before reaching the bottom.
Step 6: Apply the Drips
Transfer the cooled ganache to a squeeze bottle or a piping bag with a small round tip cut — both give you precise control over the drip application. Remove the chilled cake from the refrigerator. Working quickly around the perimeter of the cake, apply small amounts of ganache at the top edge, allowing it to drip naturally down the sides. Vary the length of your drips intentionally — a mix of short, medium, and long drips looks far more natural and professional than uniform drips of identical length. Apply drips approximately every 1 to 1.5 inches around the perimeter.
Once the perimeter drips are complete, pour a small amount of ganache in the center of the cake top and spread it gently toward the edges with an offset spatula or the back of a spoon — this fills the top with a smooth pool of ganache that ties the drips together visually and provides a beautiful base for decoration. Return the cake to the refrigerator for 10–15 minutes to allow the ganache to set completely before adding decorations.
Step 7: Decorate and Style
This is where the cake transforms from beautiful to genuinely breathtaking. Work from the largest decorative elements down to the smallest. Place macarons in a cluster on the top of the cake first, then position fresh or freeze-dried strawberries around and between them. Add small fresh roses or food-safe flowers for color and elegance. Scatter pink sugar pearls or sprinkles over the ganache top. Apply small pieces of gold leaf with a dry brush for a luxurious metallic accent. Arrange white chocolate shards dusted with pink luster dust at angles between the other decorations for height and drama.
Step back and evaluate the overall composition — a beautiful cake has visual balance, varied heights, and a color palette that feels cohesive. Add any final small details last. The finished cake should be refrigerated and brought out 30–45 minutes before serving to allow the buttercream to soften slightly to the ideal serving temperature.
Healthier Alternatives for the Recipe
Even a celebration cake can accommodate thoughtful modifications for guests with dietary needs or preferences.
Reduce the Sugar: Reduce the granulated sugar in the cake batter from 2 cups to 1.75 cups — the difference in sweetness is barely perceptible but reduces sugar per serving by approximately 6 grams. In the buttercream, Swiss meringue is already significantly less sweet than American buttercream, which is its primary advantage for health-conscious bakers.
Lighter Frosting Option: Replace the Swiss meringue buttercream with a whipped cream cheese frosting made from 2 blocks of cream cheese, ½ cup of heavy cream whipped to soft peaks, and 2 cups of powdered sugar. It is tangier, lighter in texture, lower in butter fat, and provides a pleasant counterpoint to the sweetness of the cake and ganache.
Gluten-Free Version: Replace the all-purpose flour with a 1:1 gluten-free baking flour blend — Bob’s Red Mill 1-to-1 and King Arthur Measure for Measure both work reliably in this recipe. The texture is slightly denser but entirely acceptable for a celebration cake context.
Dairy-Free Adaptation: Use vegan butter (Miyoko’s is the gold standard for baking) in place of regular butter in both the cake and buttercream. Replace buttermilk with oat milk or almond milk plus vinegar. Use full-fat coconut cream in the ganache instead of heavy cream — it produces a slightly more fluid ganache that drips beautifully and has a subtle tropical note.
Natural Pink Coloring: Replace synthetic gel food coloring with natural alternatives for both the buttercream and ganache. Freeze-dried strawberry powder produces a genuine dusty pink color with a mild strawberry flavor. Beet powder creates a deeper rose pink. Both require slightly larger quantities than gel coloring — start with 1 teaspoon and build from there.
Serving Suggestions
A pink drip cake of this scale and visual impact deserves a presentation moment that matches its beauty.
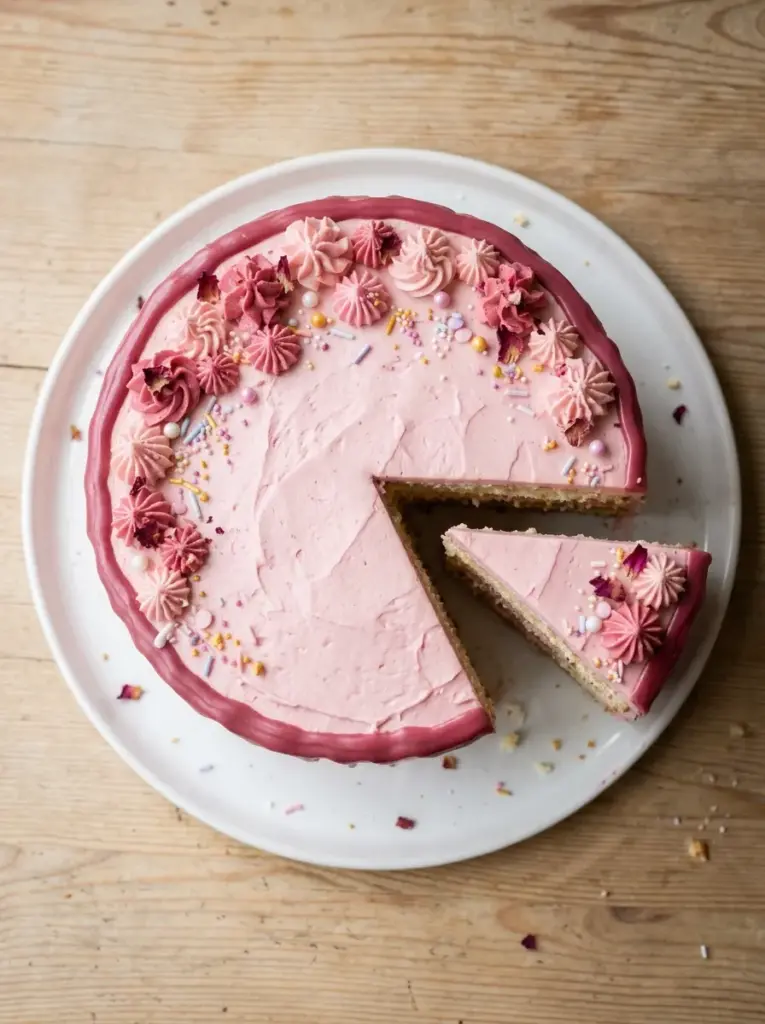
The Grand Reveal: Bring the cake to the table whole on a beautiful cake stand before cutting — give guests a moment to admire it in its full glory before slicing. The visual impact of a well-executed drip cake arriving whole at the table is genuinely memorable and sets the tone for the entire celebration.
Paired with Champagne or Prosecco: The vanilla cake and white chocolate ganache pair beautifully with the bubbles and slight sweetness of Champagne or Prosecco. For a non-alcoholic pairing, sparkling pink lemonade served in coupe glasses echoes the cake’s color palette and feels appropriately celebratory.
With Fresh Berry Coulis: Serve each slice with a small pour of warm strawberry or raspberry coulis on the plate. The tartness of the fresh berry sauce cuts through the richness of the buttercream and white chocolate ganache, adding a brightness that makes each forkful taste more balanced and refreshing.
As a Dessert Table Centerpiece: Position the cake at the center of a dessert table surrounded by coordinating smaller sweets — pink macarons, strawberry truffles, rose-dusted meringue kisses, and pink sugar cookies. The cake anchors the table visually while the surrounding sweets give guests variety and make the overall spread feel abundant.
Individual Slice Presentation: For a more elevated plated dessert experience, place each slice slightly off-center on a white plate, add a small dot of berry coulis on one side, a single fresh raspberry, a micro sprig of mint, and a light dusting of powdered sugar. This restaurant-style plating transforms a slice of layer cake into a genuinely elegant dessert course.
Common Mistakes to Avoid
These are the mistakes that most frequently prevent a drip cake from looking as polished as intended — and exactly how to sidestep every one.
Applying ganache drips to a warm cake: The single most common drip cake mistake. If the buttercream is soft or warm, the ganache will not set into defined drips — it will run straight down the sides and pool at the base. The cake must be refrigerated until the buttercream is completely firm and cold before any ganache is applied. Touch the surface — if it feels cold and completely firm, you are ready.
Using the wrong ganache temperature: Too hot and the ganache runs uncontrollably to the bottom. Too cool and it sets before flowing into a drip. The target window is 90–95°F. Use a thermometer — guessing is the primary cause of drip disasters. Test on the side of a cold glass before committing to the cake.
Using water-based food coloring in white chocolate: White chocolate seizes immediately on contact with water, turning from smooth ganache to a grainy, unworkable clump. Always use oil-based food coloring or specially formulated candy color for any chocolate application.
Rushing the buttercream process: Swiss meringue buttercream requires patience. The meringue must be completely cool before butter is added, and the butter must be added slowly. Shortcuts produce a soupy or broken buttercream that cannot be smoothed properly and will not hold drips correctly.
Applying too much ganache at once: Drips should be applied in small, controlled amounts one at a time around the perimeter. Applying too much ganache in one spot creates an uncontrolled river rather than an elegant drip. Less is more — you can always add another application once the first has set.
Skipping the crumb coat: The crumb coat is not optional. Without it, the final frosting layer will be riddled with dark cake crumbs trapped in the pink buttercream, visible through the frosting and ruining the clean, professional appearance the entire recipe is designed to achieve.
Storing Tips for the Recipe
At Room Temperature: A fully decorated drip cake can sit at room temperature for up to 4 hours in a cool environment (below 70°F). Swiss meringue buttercream is more stable than American buttercream at room temperature but will soften in warm conditions.
Refrigerating: Store the cake loosely covered in the refrigerator for up to 4 days. The cake layers actually become more moist and tender after a day in the refrigerator as the buttercream’s moisture migrates into the crumb — a phenomenon bakers call “aging” and it genuinely improves the eating quality. Remove from the refrigerator 30–45 minutes before serving to allow the buttercream to come to serving temperature.
Storing Undecorated Cake Layers: Baked and completely cooled cake layers can be wrapped tightly in two layers of plastic wrap and refrigerated for up to 3 days or frozen for up to 3 months. Thaw frozen layers overnight in the refrigerator still wrapped — they will be perfectly fresh and significantly easier to work with than freshly baked layers.
Freezing Decorated Slices: Individual slices can be frozen on a parchment-lined baking sheet until solid, then wrapped individually in plastic wrap and stored in a freezer bag for up to 2 months. Thaw individual slices in the refrigerator overnight or at room temperature for 1–2 hours.
Storing Leftover Buttercream and Ganache: Swiss meringue buttercream refrigerates for up to 1 week and freezes for up to 3 months. Re-whip briefly before using. Leftover ganache stores in the refrigerator for up to 2 weeks — reheat gently in 15-second microwave intervals, stirring between each, until it returns to the correct dripping consistency.
Conclusion
The pink drip cake is the rare baking project where the visual result is genuinely proportional to the effort invested — put in the time and care this recipe calls for, and what comes out of your kitchen will stop people in their tracks. The silky pink buttercream, the elegant cascading ganache drips, the clusters of macarons and flowers and gold leaf on top — it is a cake that communicates love and celebration and artistry in the most beautiful way food can.
The technique is learnable. The ganache temperature window is manageable. The Swiss meringue buttercream, once you have made it once, becomes one of the most satisfying kitchen skills you will possess. And the look on someone’s face when you walk into the room carrying this cake — that is entirely worth every minute.
Try this recipe for your next celebration and share photos in the comments below. Tell us what occasion you made it for, what color you chose for your buttercream, and what decorations you added to make it your own. And if you loved this baking project, explore our [Chocolate Drip Cake with Gold Leaf], [Ombre Rosette Birthday Cake], and [Lemon Raspberry Layer Cake with Mirror Glaze] for more show-stopping celebration bakes that deliver unforgettable results.
FAQs
Can I use a different color for my Pink Drip Cake?
Absolutely. The same technique works with many colors and flavor combinations. You can use a white ganache drip on chocolate buttercream, dark chocolate ganache on pale pink or white frosting, or ruby chocolate for a naturally rosy finish. When coloring white or colored chocolate ganache, use oil-based food coloring rather than water-based coloring.
My Swiss meringue buttercream looks curdled and soupy. Is it ruined?
Usually not. This can happen when the butter is too cold or the meringue is still too warm. Keep mixing on medium speed for several more minutes and the buttercream will often come together. If it remains soupy, briefly chill the bowl for about 10 minutes and then continue mixing. A smooth buttercream is essential for achieving clean sides on your Pink Drip Cake.
How far in advance can I make Pink Drip Cake?
The fully assembled Pink Drip Cake can be refrigerated for up to 3 days before serving. The cake layers can be prepared several days ahead and refrigerated, or frozen for longer storage. Swiss meringue buttercream can also be prepared ahead and refrigerated, while the ganache is best prepared close to the time you plan to decorate the cake.
What size cake pans should I use?
This recipe works well with four 8-inch round cake pans for a tall, dramatic Pink Drip Cake. You can also use three 9-inch pans for a slightly shorter cake. If changing the pan size significantly, adjust the batter quantity and baking time accordingly.
Can I make cupcakes instead of a Pink Drip Cake?
Yes. The same batter can be used to make approximately 36–40 standard cupcakes, depending on how full you fill the liners. Bake at 350°F for about 18–20 minutes, then decorate with pink Swiss meringue buttercream and small ganache drips for individual versions of the Pink Drip Cake.
Why did the drips run all the way to the bottom of my Pink Drip Cake?
The ganache was likely too warm, the drips were too large, or the cake was not cold enough. Chill the cake thoroughly before decorating and allow the ganache to cool until it is thick enough to control. Test one small drip first, then adjust the temperature or consistency before decorating the entire Pink Drip Cake.
How do I get perfectly smooth buttercream sides?
A rotating cake turntable, long straight scraper, and offset spatula make the job much easier. Apply a generous layer of buttercream, hold the scraper vertically against the cake, and rotate the turntable smoothly. Chilling the crumb coat before applying the final layer also helps create clean, smooth sides on your Pink Drip Cake.
More Dessert Recipes to Try

Pink Drip Cake
Ingredients
Equipment
Method
- Preheat the oven to 350°F (175°C).
- Grease two 8-inch round cake pans and line the bottoms with parchment paper.
- Whisk together the flour, baking powder, and salt in a bowl.
- In a large bowl, beat the softened butter and sugar until light and fluffy.
- Add the eggs one at a time, mixing well after each addition.
- Mix in the vanilla extract.
- Gradually add the dry ingredients, alternating with the milk, and mix until just combined.
- Divide the batter evenly between the prepared pans.
- Bake for 25 to 30 minutes, or until a toothpick inserted into the center comes out clean.
- Cool the cakes in the pans for 10 minutes, then transfer them to a wire rack to cool completely.
- For the buttercream, beat the softened butter until creamy.
- Gradually add the powdered sugar, vanilla extract, and heavy cream.
- Beat until smooth and fluffy.
- Add pink gel food coloring and mix until the desired shade is reached.
- Place one cake layer on a serving plate and spread an even layer of pink buttercream over the top.
- Place the second cake layer on top.
- Apply a thin crumb coat around the entire cake and refrigerate for 20 minutes.
- Apply the remaining buttercream and smooth the top and sides with a cake scraper.
- Refrigerate the cake for another 20 to 30 minutes before adding the drip.
- Place the chopped white chocolate in a microwave-safe bowl.
- Heat the heavy cream until hot but not boiling, then pour it over the chocolate.
- Let it sit for 2 minutes, then stir until smooth.
- Let the ganache cool slightly until it reaches a thick but pourable consistency.
- Drizzle the ganache around the edge of the chilled cake, allowing it to drip naturally down the sides.
- Spread the remaining ganache over the center of the cake.
- Pipe small buttercream swirls around the top edge.
- Add rainbow sprinkles for decoration.
- Chill for 20 minutes before slicing and serving.
Notes
The cake should be well chilled before adding the drip so the ganache sets quickly.
Test the ganache on one small section first. If the drip runs too quickly, let it cool longer.
Gel food coloring gives a brighter pink color without thinning the frosting.
For a more elegant look, use pink or white sprinkles instead of rainbow sprinkles.
Store the cake covered in the refrigerator for up to 4 days.
Let the cake sit at room temperature for 20 to 30 minutes before serving.
Enjoying AmandBox? Follow us on Pinterest for more recipes.