
Taco Rice Bowls
Here is a number that reframes the entire fast-casual restaurant industry: according to market research firm Datassential, the rice bowl category has grown by 312% in American restaurant menus over the past six years — faster than any other dinner format tracked. And the leading driver of that growth is not a chain or a brand. It is home cooks discovering that a rice bowl built at home, with properly seasoned meat, freshly made toppings, and a sauce that actually tastes like something, delivers a better result than any $15 burrito bowl from a counter-service restaurant.
Taco rice bowls sit at the intersection of two of the most beloved food formats in American cuisine — the taco and the grain bowl — and capture the best elements of both. The seasoned, deeply flavored ground beef or chicken of a great taco. The customizable, build-your-own accessibility of a grain bowl. The freshness of real pico de gallo, creamy avocado, tangy lime crema, and vibrant shredded cheese — all arranged over a bed of fluffy, perfectly cooked rice that absorbs every drop of the surrounding flavors.
Table of Contents
Ingredients
Taco rice bowls are built from multiple components, each of which is simple on its own. The combination of all of them together is what creates the experience. The quantities below serve 4 generously.
For the Seasoned Taco Meat:
- 1.5 lbs (680g) ground beef, 80/20 blend (the fat carries the spice flavors and keeps the meat moist and flavorful — leaner blends tend to produce drier, less satisfying taco meat)
- OR 1.5 lbs ground chicken or turkey for a lighter version
- 1 tablespoon olive oil
- 1 small yellow onion, finely diced
- 3 garlic cloves, minced
- 1 tablespoon chili powder
- 1½ teaspoons ground cumin
- 1 teaspoon smoked paprika
- ½ teaspoon garlic powder
- ½ teaspoon onion powder
- ½ teaspoon dried oregano
- ¼ teaspoon cayenne pepper
- 1 teaspoon kosher salt
- ½ teaspoon freshly ground black pepper
- ½ cup (120ml) tomato sauce or crushed tomatoes
- ¼ cup (60ml) beef or chicken broth
- 1 tablespoon Worcestershire sauce
- 1 teaspoon fresh lime juice
For the Rice:
- 1½ cups (285g) long-grain white rice, rinsed thoroughly until the water runs clear
- 2¼ cups (540ml) chicken broth, low sodium (cooking rice in broth rather than water adds a subtle savory depth that makes the rice taste intentional rather than incidental)
- 1 tablespoon unsalted butter
- ½ teaspoon kosher salt
- ½ teaspoon garlic powder
- 1 tablespoon fresh lime juice, added after cooking
- 2 tablespoons fresh cilantro, roughly chopped, added after cooking
For the Fresh Pico de Gallo:
- 3 medium roma tomatoes, seeded and finely diced
- ½ medium white onion, finely diced
- 1 jalapeño, seeded and minced (leave seeds in for more heat)
- ¼ cup fresh cilantro, roughly chopped
- 2 tablespoons fresh lime juice
- ½ teaspoon kosher salt
For the Lime Crema:
- ½ cup (120g) sour cream or Mexican crema
- 2 tablespoons fresh lime juice
- 1 teaspoon lime zest
- 1 small garlic clove, finely grated
- ¼ teaspoon kosher salt
- 1–2 tablespoons milk or water to thin to a drizzleable consistency
For the Bowl Toppings (mix and match):
- 1 cup shredded Mexican cheese blend or sharp cheddar
- 2 ripe avocados, diced or sliced, or prepared guacamole
- 1 can (15 oz) black beans, drained, rinsed, and warmed with a pinch of cumin and salt
- 1 cup frozen corn, thawed and charred in a dry skillet for 3–4 minutes
- Shredded iceberg or romaine lettuce
- Pickled red onions
- Sliced fresh jalapeños
- Fresh cilantro sprigs
- Lime wedges for serving
- Hot sauce of choice
Smart Substitutions: Prefer chicken over beef? Season boneless, skinless chicken thighs with the same spice blend and cook in a skillet until golden, then shred or dice. For a vegetarian version, replace the meat entirely with 2 cans of drained black beans and 1 cup of diced mushrooms cooked with the full spice blend — the mushrooms provide an umami depth and meaty texture that makes the absence of meat genuinely unnoticeable. Brown rice can replace white rice — use a 2:1 liquid ratio and extend the cooking time to 40–45 minutes. Cauliflower rice makes an excellent low-carbohydrate base.
Timing
Taco rice bowls are efficient when components are prepared simultaneously. With parallel cooking, the total time drops to just over 30 minutes — making this one of the most practical build-your-own dinner formats for a busy weeknight.
- Prep Time: 15 minutes (dicing vegetables, measuring spices, making pico and crema)
- Cook Time: 30 minutes (rice and meat cook simultaneously)
- Total Time: 35 minutes
- Servings: 4
- Difficulty Level: Very Easy
Pro Timing Tip: Make the pico de gallo and lime crema first — both improve significantly with even 15–20 minutes of resting time as the flavors meld. Start the rice next, since it requires the most unattended time. Begin the taco meat last, since it cooks quickly and is best served immediately rather than sitting and drying out. With this sequence, everything finishes at the same time and the taco meat is at its most flavorful and freshest when it hits the bowl.
Step 1: Make the Pico de Gallo
Combine the diced roma tomatoes, white onion, jalapeño, cilantro, lime juice, and salt in a medium bowl. Stir to combine thoroughly. Taste and adjust — more lime for brightness, more salt to amplify the tomato flavor, more jalapeño for heat. Set aside at room temperature while you prepare the remaining components.
The 15–20 minutes of resting time allows the salt to draw moisture from the tomatoes, creating a small amount of natural tomato liquid that loosens the pico slightly and concentrates the flavor of every ingredient. A freshly made pico that has rested for even 10 minutes tastes dramatically more cohesive and vibrant than one served immediately after mixing. Do not skip the rest.
Step 2: Make the Lime Crema
Whisk together the sour cream, lime juice, lime zest, grated garlic, and salt in a small bowl until completely smooth. Thin with milk or water one tablespoon at a time until the crema reaches a consistency that pours in a thin, even drizzle from a spoon — similar to a thick salad dressing. Transfer to a small squeeze bottle if available for more precise drizzling over the assembled bowls. Refrigerate until needed.
The lime crema is the sauce that ties the entire bowl together — its cool, tangy creaminess against the spiced meat, the fresh pico, and the warm rice creates the cohesive flavor experience that elevates a taco rice bowl from a collection of components into a unified, intentional dish. Do not skip it or substitute with plain sour cream — the lime and garlic are essential.
Step 3: Cook the Rice
Rinse the long-grain white rice in cold water until the water running off it is completely clear — this removes surface starch that would otherwise make the rice sticky and clumped rather than fluffy and separate. Combine the rinsed rice, chicken broth, butter, salt, and garlic powder in a medium saucepan over medium-high heat. Bring to a boil, stir once, then reduce to the lowest possible heat setting. Cover with a tight-fitting lid and cook for 18 minutes without lifting the lid.
After 18 minutes, remove from heat and let the rice sit, covered and undisturbed, for 5 additional minutes. This resting period allows the steam trapped inside the pot to redistribute moisture evenly through the rice, producing grains that are uniformly tender and perfectly fluffy rather than wet at the bottom and dry at the top. Fluff with a fork — never a spoon, which compresses and clumps the rice. Add the lime juice and chopped cilantro and fluff again to distribute evenly. The lime juice brightens the subtle savory flavor of the broth-cooked rice and the cilantro adds fresh aromatics that connect the rice to the Mexican-inspired flavor profile of the entire bowl.
Step 4: Brown and Season the Taco Meat
Heat the olive oil in a large skillet over medium-high heat. Add the diced onion and cook for 3–4 minutes until softened. Add the minced garlic and cook for 60 seconds. Add the ground beef and cook, breaking it into crumbles, over medium-high heat — leave it undisturbed for the first 2–3 minutes to develop proper Maillard browning on the bottom before breaking it apart. Properly browned taco meat has a deeply savory, almost nutty flavor from the caramelization that pale, steamed meat cannot replicate.
Once the beef is fully browned and no pink remains, drain any excess fat — leaving approximately 1 tablespoon in the pan for flavor. Add the entire spice blend — chili powder, cumin, smoked paprika, garlic powder, onion powder, oregano, cayenne, salt, and pepper — all at once and stir to coat the meat completely.
Cook the spices in the meat and fat for 60–90 seconds, allowing the heat to bloom their fat-soluble flavor compounds. Add the tomato sauce, broth, and Worcestershire sauce. Stir to combine and simmer over medium heat for 5–7 minutes until the liquid has reduced and the meat is saucy but not wet — the sauce should cling to the meat rather than pool at the bottom of the pan. Add the lime juice, stir, and remove from heat. Taste and adjust seasoning.
Step 5: Char the Corn (Optional but Recommended)
While the taco meat simmers, heat a dry cast iron skillet or regular skillet over high heat until extremely hot — a drop of water should evaporate immediately on contact. Add the thawed frozen corn in a single layer and cook without stirring for 2–3 minutes until the kernels develop dark, charred spots on one side. Toss and cook for another minute. Remove from heat. The charring caramelizes the corn’s natural sugars, adds a smoky depth, and produces a textural contrast between the slightly crispy exterior and sweet, tender interior that makes the corn a genuinely exciting element rather than an afterthought.
Step 6: Warm the Black Beans
Place the drained, rinsed black beans in a small saucepan over medium heat with a splash of broth or water, a pinch of cumin, a pinch of salt, and a pinch of smoked paprika. Cook, stirring occasionally, for 3–4 minutes until heated through and fragrant. Warming the beans with seasoning transforms them from canned beans — serviceable but unremarkable — into something that contributes actively to the flavor profile of the bowl.
Step 7: Assemble the Bowls
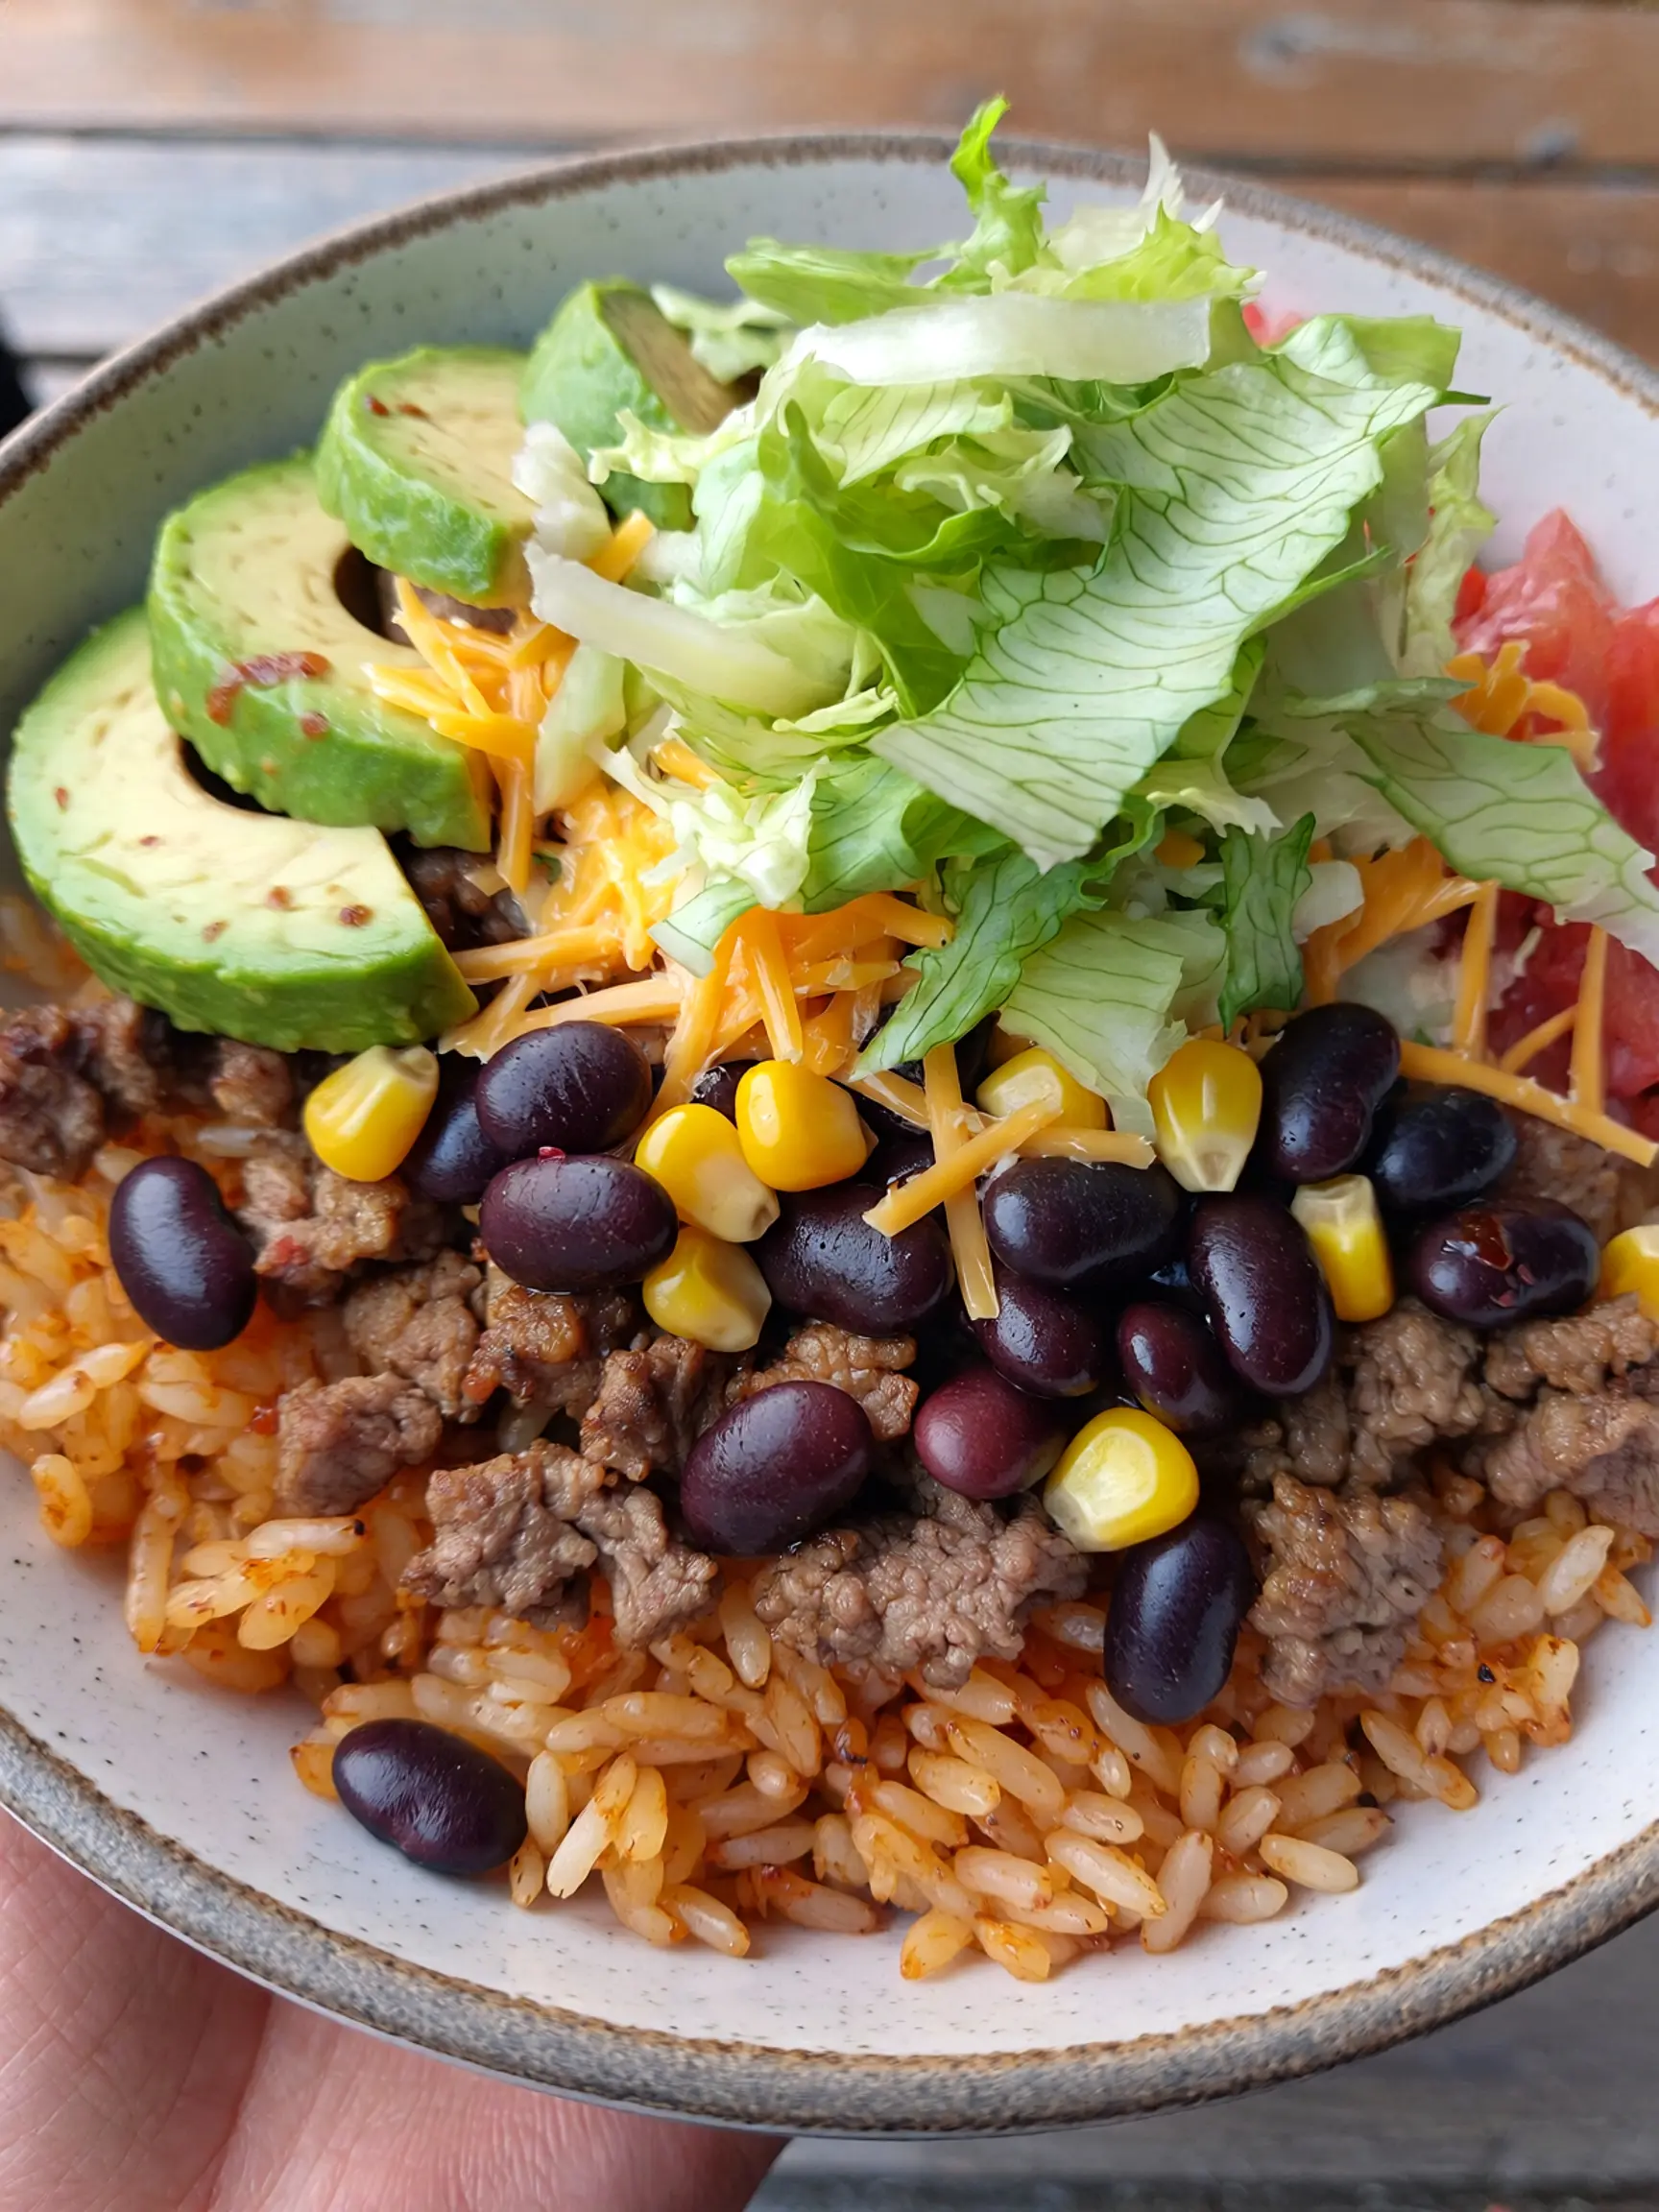
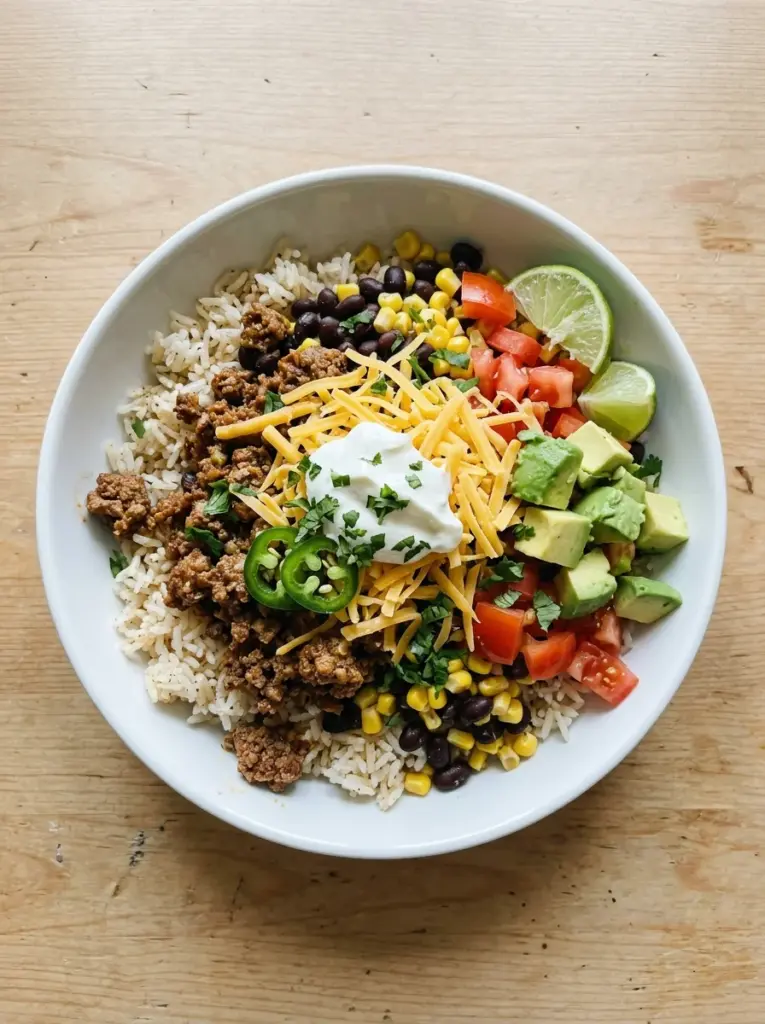
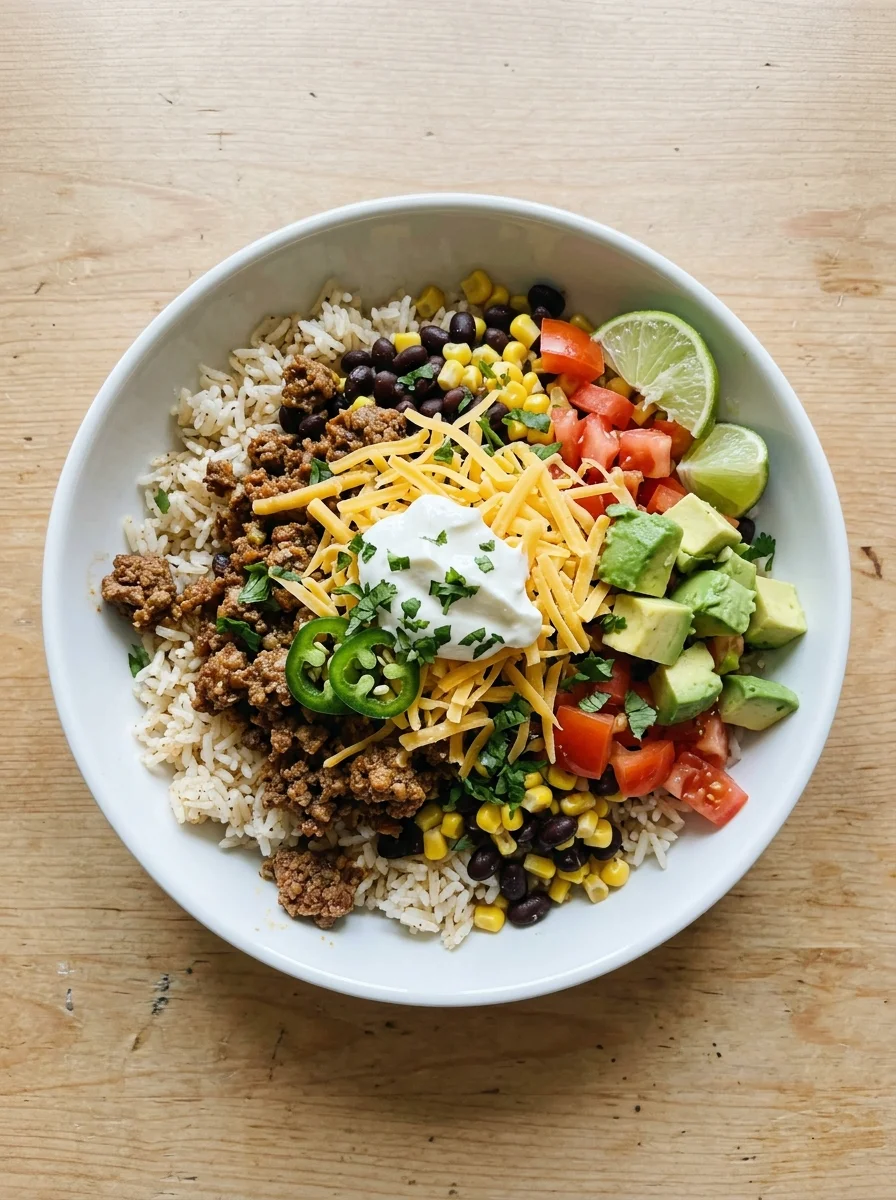
This is the step that makes taco rice bowls so satisfying — both to make and to eat. Start with a generous base of the lime cilantro rice — approximately ¾ cup per bowl. Arrange the taco meat to one side, covering approximately one quarter of the rice surface. Add the warmed black beans to another section. Arrange the charred corn, shredded lettuce, and diced avocado in the remaining sections.
Spoon the fresh pico de gallo generously over the top of the entire bowl, letting it fall naturally across the other components. Scatter shredded cheese over everything while the meat and beans are still warm so it melts slightly against the warm surface beneath. Drizzle the lime crema in a zigzag pattern across the entire bowl. Add pickled red onions, sliced jalapeños, and fresh cilantro sprigs. Place a lime wedge on the rim of the bowl. Serve with hot sauce on the side.
The visual presentation of a well-assembled taco rice bowl is part of its appeal — each component should be distinct and identifiable rather than mixed together into an indistinct pile. The bowl should look abundant, colorful, and genuinely appetizing before a single bite is taken.
Healthier Alternatives for the Recipe
Taco rice bowls are naturally customizable to a wide range of nutritional goals — the build-your-own format makes health-conscious modifications genuinely easy without anyone at the table feeling shortchanged.
Lower the Fat and Calories: Use 93/7 lean ground beef or ground turkey, and reduce the cheese to a light sprinkle rather than a generous handful. Replace the sour cream crema with a Greek yogurt-based crema — same proportions, same lime and garlic seasoning, approximately 60% less fat and significantly more protein per tablespoon. Per-serving calorie reduction: approximately 100–120 calories.
Increase the Fiber: Add a generous scoop of the charred corn and black beans to every bowl — each adds fiber, plant-based protein, and a low-glycemic energy source that extends satiety significantly. Replace white rice with brown rice or a 50/50 blend of white rice and farro — farro in particular has a pleasantly chewy texture and delivers nearly three times the fiber of white rice per serving.
Make It Fully Plant-Based: Replace the ground beef with 1.5 cups of cooked brown or green lentils seasoned with the full spice blend, or use a combination of diced mushrooms and black beans as the protein base. Use plant-based cheese and coconut yogurt-based crema. The full taco flavor profile — the spices, the tomato, the lime — is assertive enough to carry a plant-based protein base without any sense of compromise.
Lower the Sodium: Use low-sodium chicken broth for the rice and meat, no-salt-added canned black beans, and season with the spice blend only — tasting and adjusting with a small amount of finishing salt at the end. The lime juice and fresh toppings provide significant perceived flavor without sodium. These adjustments can reduce per-serving sodium by 200–250mg.
Cauliflower Rice Base: Replace all or half the white rice with cauliflower rice for a dramatically lower-carbohydrate bowl. Sauté the cauliflower rice in a skillet with butter, garlic powder, and lime juice for 4–5 minutes until lightly golden — the brief cooking removes the raw, sulfurous note raw cauliflower can have and produces a pleasantly nutty, fluffy base that absorbs the surrounding flavors beautifully.
Serving Suggestions
The taco rice bowl format is inherently flexible and moves between casual weeknight dinner and impressive entertaining with minimal effort.
The DIY Bowl Bar: Set all components in separate serving bowls at the center of the table and let everyone assemble their own bowl. This format is ideal for families with varied preferences — picky eaters can keep components separate, adventurous eaters can pile everything on, and no one feels their dinner was compromised. The visual abundance of a full bowl bar spread is genuinely impressive and creates a social, interactive dining experience that feels like an event rather than a Tuesday night dinner.
Meal Prep Bowls: Portion each component separately into meal prep containers and refrigerate. Each container provides a complete lunch or dinner that reheats in 90 seconds — keep the pico de gallo, avocado, and crema separate until serving. Pre-assembled taco rice bowls keep in the refrigerator for up to 4 days and are infinitely superior to any purchased lunch option.
Taco Rice Bowl Salad: Double the lettuce and use it as the primary base rather than a topping. Dress the lettuce with a portion of the lime crema whisked with a teaspoon of olive oil as a salad dressing, then build the bowl components over the dressed greens. The result is a taco salad format that is lighter, fresher, and more voluminous — ideal for warmer weather or lower-calorie goals.
Loaded Nachos Version: Spread tortilla chips on a large sheet pan, top with the seasoned taco meat, black beans, and shredded cheese, and bake at 400°F for 8–10 minutes until the cheese is melted and bubbly. Remove from the oven and top with all the cold bowl toppings — pico, avocado, crema, jalapeños — and serve immediately. This nachos variation uses the same taco meat recipe and delivers a dramatically different presentation ideal for game day or casual entertaining.
In Lettuce Wraps: Spoon the taco meat, rice, beans, and toppings into large leaves of butter lettuce or iceberg lettuce instead of serving in a bowl. The lettuce cup format is fresh, low-carbohydrate, and particularly appealing in warm weather — it also makes the dish effortlessly hand-held and ideal for outdoor entertaining.
Common Mistakes to Avoid
These are the errors most likely to prevent a taco rice bowl from delivering the vibrant, cohesive, deeply flavored experience it is capable of producing.
Under-seasoning the taco meat: Ground beef is bland without assertive seasoning. The spice blend in this recipe is calibrated to produce bold, restaurant-quality taco flavor — do not reduce the quantities, do not skip the blooming step, and taste the finished meat before serving. It should taste boldly seasoned on its own, because its flavor softens once it is surrounded by rice, beans, and cold toppings.
Not rinsing the rice: Un-rinsed rice carries excess surface starch that produces sticky, clumped, gummy cooked rice rather than the fluffy, separate grains that a bowl format requires. Rinse under cold water until the water runs completely clear — it takes 60 seconds and makes a perceptible difference in the finished texture.
Lifting the rice pot lid during cooking: The steam trapped inside the pot is what cooks the rice evenly and produces fluffy results. Every lid lift releases steam and disrupts the cooking process. Set a timer, resist the temptation entirely, and do not open the lid until the full resting period has completed.
Adding all toppings before the bowl is composed: The visual and textural experience of a great taco rice bowl depends on each component remaining distinct and identifiable. Mix everything together before eating if that is your preference — but compose the bowl with each ingredient in its own section first. The presentation matters and it takes only 60 additional seconds.
Skipping the pico de gallo resting time: Fresh pico assembled and immediately served tastes sharp, separate, and slightly aggressive. Pico that has rested for 15–20 minutes tastes cohesive, balanced, and vibrant. Make it first, every single time.
Using cold toppings on a cold rice base: The bowl should have temperature contrast — warm rice and meat, warm beans, room-temperature or slightly warm corn, and cold toppings like pico, crema, and avocado. Serving the rice at room temperature or adding cold beans straight from the can produces a flat, uniformly cool bowl that lacks the contrast of temperatures that makes the format so compelling.
Storing Tips for the Recipe
Storing Components Separately: The most important storage principle for taco rice bowls is to keep each component separate. Taco meat, rice, beans, and corn can all be combined in a single container if needed — but fresh toppings like pico de gallo, avocado, crema, and lettuce must be stored separately and added fresh at serving time.
Refrigerating the Taco Meat: Store in an airtight container for up to 4 days. The spices continue to develop in the meat during refrigeration and day-two taco meat is often more flavorful than freshly made. Reheat in a skillet over medium heat with a splash of broth to restore moisture, or microwave at 70% power in 90-second intervals.
Refrigerating the Rice: Store in an airtight container with a piece of dampened paper towel placed over the surface before sealing — the paper towel prevents the rice from drying out and becoming hard during refrigeration. Reheat in the microwave with 1–2 tablespoons of water added, covered with a damp paper towel, at full power for 90 seconds. Stir and heat for an additional 30 seconds if needed.
Storing the Pico de Gallo: Refrigerate in an airtight container for up to 2 days. After 2 days, the tomatoes release too much liquid and the pico becomes watery and loses its fresh character. Make smaller batches more frequently for the best result.
Freezing the Taco Meat: The seasoned ground beef freezes beautifully for up to 3 months. Portion into zip-lock freezer bags, press flat, and freeze. Thaw overnight in the refrigerator and reheat as described. With pre-seasoned taco meat in the freezer, a complete taco rice bowl takes under 20 minutes on any weeknight — cook fresh rice, thaw and reheat the meat, assemble with fresh toppings.
Meal Prep Strategy: Cook a full batch of taco meat and a double batch of rice on Sunday. Portion into individual containers alongside warmed black beans and charred corn. Store pico, crema, and avocado separately. Each container provides a complete, nutritionally balanced meal for Monday through Thursday that requires only 90 seconds of reheating and 60 seconds of fresh topping assembly.
Conclusion
Taco Rice Bowls are the kind of weeknight dinner that earns a permanent place in your meal rotation through reliable, deeply satisfying results. Bold, well-seasoned meat pairs with fluffy cilantro-lime rice, fresh pico de gallo, cool crema, warm black beans, charred corn, and creamy avocado. Every component is simple on its own, but together these Taco Rice Bowls create a flavorful meal that the whole family can customize.
The technique is easy to learn: brown the meat properly, bloom the spices, let the pico de gallo rest, rinse the rice, and build the bowl with intention. Follow these simple steps and you will have Taco Rice Bowls that are fresh, flavorful, and more affordable than many fast-casual alternatives.
Make these Taco Rice Bowls this week and set up a bowl bar so everyone can build their own combination. Choose ground beef or chicken, white rice or brown rice, mild toppings or extra spice, and finish with your favorite fresh ingredients. Share your Taco Rice Bowls combination in the comments and tell us how you made it your own.
If Taco Rice Bowls have earned a permanent spot in your weeknight rotation, explore our Burrito Bowls with Cilantro Lime Rice, Korean Ground Beef Bowls, and Teriyaki Chicken Rice Bowls for more flavorful, customizable grain bowl dinners that deliver maximum satisfaction with minimum effort.
FAQs
Q: Can I use store-bought taco seasoning instead of making my own spice blend? Yes — one packet of store-bought taco seasoning (approximately 1 oz) can replace the homemade spice blend in this recipe. Follow the package directions for the liquid quantities to add. The homemade blend is preferred because it allows you to control the sodium level, adjust the heat, and customize the flavor profile — store-bought packets tend to be higher in sodium and lower in complexity than a freshly made blend. If using a packet, reduce or eliminate the added salt in the recipe and taste carefully before serving.
Q: What is the best rice for taco rice bowls? Long-grain white rice — specifically jasmine or basmati — produces the fluffiest, most separate-grained result and is the recommended choice. Jasmine rice has a subtle floral aroma that complements the lime and cilantro finish beautifully. Basmati is slightly drier and produces the most distinct individual grains. Medium-grain rice works but produces a stickier result. Brown rice adds fiber and a nutty flavor — use a 2:1 liquid ratio and extend the cooking time to 40–45 minutes.
Q: Can I make taco rice bowls ahead for a party? Absolutely — and the format is ideal for entertaining. Make the taco meat up to 2 days in advance and refrigerate. Cook the rice the morning of the party and hold it warm. Make the pico de gallo the morning of the party. Prepare the crema up to 3 days in advance. Set all components in separate serving bowls or hotel pans and let guests serve themselves — a taco rice bowl bar is one of the most practical, crowd-pleasing, universally appreciated party feeding formats available.
Q: My taco meat turned out dry and crumbly. What went wrong? Dry, crumbly taco meat results from one of two causes: using meat that is too lean (93/7 or leaner) without compensating fat, or cooking the meat too long after adding the liquid. The liquid phase — tomato sauce and broth — should simmer for only 5–7 minutes, just long enough to reduce to a saucy consistency that clings to the meat. Longer simmering evaporates the liquid entirely and the meat dries out. Use 80/20 ground beef for the juiciest result, or add an extra tablespoon of olive oil to leaner meat before browning.
Q: How do I prevent my avocado from browning after cutting? Toss diced or sliced avocado immediately with fresh lime juice — the citric acid slows enzymatic browning significantly. Store any remaining cut avocado with a piece of the pit pressed against the cut surface and covered tightly with plastic wrap pressed directly against the surface with no air pockets. Properly stored, cut avocado will stay green for up to 24 hours in the refrigerator. For assembled bowls, add the avocado as the very last topping immediately before serving.
Q: Can I make this recipe in the Instant Pot? Yes — and it is an efficient approach. Use the Sauté function to brown the onion, garlic, and ground beef directly in the Instant Pot. Add all seasonings, tomato sauce, broth, and Worcestershire sauce. Pressure cook on HIGH for 8 minutes with a quick release. The meat will be deeply flavored and tender. For the rice, cook it separately on the stovetop or in a rice cooker — rice cooked in a pressure cooker alongside seasoned meat tends to absorb too much of the meat’s fat and liquid and produces an inconsistent texture.
Q: What hot sauces work best with taco rice bowls? The best hot sauce is entirely personal, but several pair particularly well with the Mexican-inspired flavor profile. Cholula Original is mild, tangy, and arbol-pepper-forward — it adds brightness without overwhelming heat. Valentina is vinegar-forward with a deep chili flavor and mild-to-medium heat. Tapatio is saltier and slightly more assertive. For genuine heat, Yellowbird Habanero or Tapatío Picante add significant fire. El Yucateco Black Label Reserve is intensely smoky and hot — a small amount goes a very long way and is exceptional over the seasoned beef.
More Dinner Recipes to Try

Taco Rice Bowls
Ingredients
Equipment
Method
- Heat the olive oil in a large skillet over medium heat.
- Add the ground beef and cook for 6 to 8 minutes, breaking it apart with a wooden spoon, until browned and fully cooked.
- Drain excess grease if necessary.
- Add the chili powder, cumin, paprika, garlic powder, onion powder, salt, and black pepper.
- Stir well and cook for another 1 to 2 minutes.
- Warm the black beans and corn in the skillet with the seasoned beef for 2 to 3 minutes.
- Divide the cooked rice among four bowls.
- Top each bowl with the seasoned beef mixture.
- Add the tomatoes, shredded cheddar cheese, red onion, cilantro, and avocado.
- Serve with sour cream, salsa, and lime wedges.
- Serve immediately.
Notes
Brown rice or cauliflower rice can be used instead of white rice.
Add jalapeños or extra chili powder for more heat.
Prepare the rice and beef ahead of time for easy meal prep.
Store the components separately in airtight containers in the refrigerator for up to 4 days.
Add fresh avocado and toppings just before serving.
Enjoying AmandBox? Follow us on Pinterest for more recipes.